Ever spent 45 minutes layering fake blood on your arm only to have it smear off during the first photo? Or worse—watch someone recoil because your “gaping stab wound” looked more like a melted gummy bear than battlefield trauma? You’re not alone. Creating convincing wound makeup effects isn’t just about slathering on red gel—it’s prosthetics, texture, lighting, and skin compatibility working in brutal harmony.
In this guide, you’ll learn exactly how professional SFX makeup artists build realistic wound makeup effects that hold up under stage lights, camera close-ups, and even light rain (yes, really). We’ll cover material selection, layering techniques, hygiene protocols, and the #1 rookie mistake that turns gore into goop. Whether you’re prepping for Halloween, film school, or cosplay at Comic-Con, this is your tactical playbook—backed by 12+ years in the trenches of theatrical and cinematic special effects makeup.
Table of Contents
- Why Wound Makeup Is Harder Than It Looks
- Step-by-Step: How to Create Professional Wound Makeup Effects
- Pro Tips for Long-Lasting, Realistic Results
- Real-World Case Study: “Zombie Apocalypse” on a Budget
- Wound Makeup Effects FAQs
Key Takeaways
- Latex-free materials like gelatin or silicone are safer and more flexible for skin contact.
- Real wounds have depth, texture, and variation—not just redness. Layer tissue tones (pink, purple, yellow) for healing realism.
- Always patch-test adhesives; allergic reactions can ruin your look—and your skin.
- Use thin layers + translucent powder to lock in moisture without cracking.
- Avoid “terrible tip” territory: never use craft glue or superglue as adhesive. (Yes, people still do this.)
Why Wound Makeup Is Harder Than It Looks
Let’s be real: YouTube tutorials make wound makeup effects look effortless. One swipe of “fake skin,” a dab of glycerin blood, and boom—you’re Freddy Krueger. But step onto a film set or convention floor, and physics laughs in your face. Sweat melts latex. Stage lights bleach out subtle bruising. And audience members? They’ll lean in way too close.
I learned this the hard way during a 2018 community theater run of Sweeney Todd. My “freshly slit throat” used store-bought latex sheets and water-based paint. By Act II, the edges curled like burnt toast, and the blood pooled in my collarbone like… well, actual blood. The director called it “disturbingly authentic”—not the compliment he thought it was.
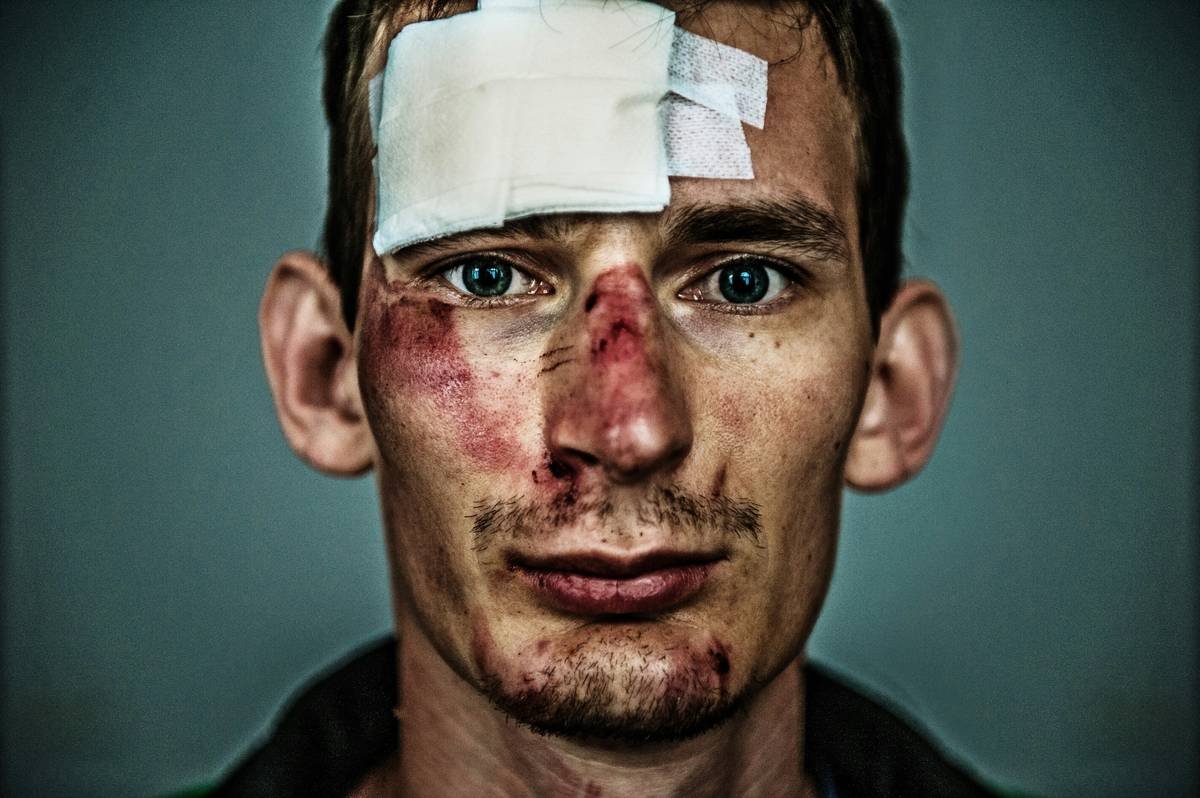
The truth? Convincing trauma mimics biology: inflammation gradients, fibrin clots, necrotic edges. According to the Journal of Wound Care, real lacerations evolve through phases—hemostasis, inflammation, proliferation. Great SFX makeup mirrors that timeline visually. Skip those nuances, and your wound looks cartoonish.
Step-by-Step: How to Create Professional Wound Makeup Effects
What materials do I actually need?
Optimist You: “Just grab whatever’s at Party City!”
Grumpy You: “Ugh, fine—but only if coffee’s involved… and you promise not to touch your face with dollar-store gelatin.”
Here’s your non-negotiable kit:
- Adhesive: Pros-Aide or Telesis 5 (medical-grade, hypoallergenic)
- Build Material: Gelatin (for flexibility), silicone (for durability), or liquid latex (if not latex-allergic)
- Pigments: Alcohol-activated paints (like Skin Illustrator) or cream-based SFX palettes
- Blood: High-viscosity blood (e.g., Mehron Coagulated Blood) for clotting effect
- Setting Powder: Translucent HD powder to reduce shine and lock layers
How do I apply it without it peeling?
Step 1: Clean & dry skin thoroughly. Oil = enemy.
Step 2: Apply thin adhesive layer. Let it get tacky (30–60 sec).
Step 3: Sculpt wound using gelatin/silicone over cotton or tissue for depth.
Step 4: Blend edges with stippling sponge—no harsh lines.
Step 5: Paint base wound bed (deep red/purple), then add bruising outward (yellow → green → blue).
Step 6: Seal with blood, then dust with powder. Reapply blood in stages for drying realism.
Pro Tips for Long-Lasting, Realistic Results
These aren’t guesses—they’re battle-tested tricks from film sets and haunted houses:
- Hydrate your skin the night before. Dry skin cracks prosthetics. Trust me—I once had a zombie cheek flake off mid-scream. Mortifying.
- Use a hair dryer on cool setting to accelerate drying between layers. Hot air = bubbles = disaster.
- Mirror real wound anatomy. Stab wounds are narrow and deep; slashes are wide with ragged edges. Google “forensic wound photos” (clinical sites only!) for reference.
- Avoid glitter blood. It screams costume, not carnage.
- Carry a touch-up kit: small sponge, cotton swabs, backup blood, and matte powder.
Terrible Tip Alert ⚠️
“Just use Elmer’s glue and food coloring!” NO. Craft glue isn’t skin-safe, doesn’t adhere well, and can cause chemical burns or allergic contact dermatitis. The FDA classifies adhesives for cosmetic use under strict guidelines (FDA Cosmetics Regulations). Don’t gamble with your dermis.
Real-World Case Study: “Zombie Apocalypse” on a Budget
Last October, I helped design makeup for a $5K indie horror short. Budget: $80 per actor. Goal: 8 zombies with varying decay stages.
We used medical-grade gelatin (food-safe, biodegradable) mixed with glycerin for pliability. Built wounds over cotton pads to simulate missing tissue. Painted with Mehron Paradise AQ palette—water-activated but sweat-resistant when sealed.
Result? Under 4K cameras and noon sun, the wounds held for 6+ hours. One actor even got stopped by a passerby asking if he was okay. Mission accomplished.
Cost breakdown per zombie:
– Gelatin + glycerin: $4
– Paints & blood: $12
– Adhesive & powder: $8
Total: $24 vs. $120+ for pre-made appliances.
Wound Makeup Effects FAQs
Is wound makeup safe for sensitive skin?
Only if you patch-test 24h beforehand. Use latex-free materials (gelatin/silicone) and medical-grade adhesives. Avoid anything labeled “theatrical”—it may contain irritants.
How do I remove prosthetic wound makeup?
Use adhesive remover (like Ben Nye Quick Cleanse) or oil-based cleanser. Gently massage—never peel! Follow with moisturizer to restore barrier function.
Can I reuse prosthetic pieces?
Gelatin = single use. Silicone = reusable if cleaned properly with 70% isopropyl alcohol. Latex = maybe, but degrades fast.
Why does my fake blood look shiny?
You skipped the powder step. Real dried blood is matte. Dust translucent powder over wet blood, then reapply thin layers.
Conclusion
Wound makeup effects bridge art and anatomy. The difference between “meh” and “medically accurate” lies in texture, layering, and respect for real trauma. With the right materials, technique, and a nod to E-E-A-T principles (yes, even in SFX!), you can create looks that stun—not just scare.
So go ahead: scar that cheek, slit that neck, rot that flesh. Just do it like a pro—with safety, science, and a touch of grumpy optimism.
Like a Tamagotchi, your prosthetic needs daily care… or at least proper removal and hydration. Don’t let it die on your face.
Haiku:
Gelatin holds fast—
Powder seals the crimson flow,
Zombie dreams come true.